Mongo JEE [step0]
Several months ago, I have studied how to use Mongo DB in a JEE Application. I read the great article Modern Web Apps using JAX-RS, MongoDB, JSON, and jQuery which explains how to develop modern Web Apps :
- on client side, AJAX with jQuery is used to consume JSON by calling a REST service.
- on server side, REST service managed with JAX-RS produces JSON stream coming from MongoDB. The REST service calls MongoDB with mongo-jackson-mapper which gets JSON stream from MongoDB (which stores their data with BSON format which looks like JSON) and serializes the JSON to build a Pojo. The REST service returns the Pojo and JAX-RS implementation deserializes the Pojo to produce JSON for the jQuery client.
On other words, the server produces JSON and not the whole HTML page and the client consumes JSON to refresh the UI.
I like this architecture, but I tell me why we could to use directly the JSON stream from MongoDB instead of serialize/deserialize a Pojo. That’s why I have created Mongo JEE project which helps you to use Mongo in a JEE Application.
I have decided to write Mongo JEE articles which shows in action the feature of Mongo JEE. Those articles will explain step by step how to develop a Dojo Grid with pagination which consumes a JAX-RS REST service which produces JSON coming directly from the MongoDB with Java Driver and not with Pojo-Mapper. At the end of those articles we will have a paginated grid populated with logs data :
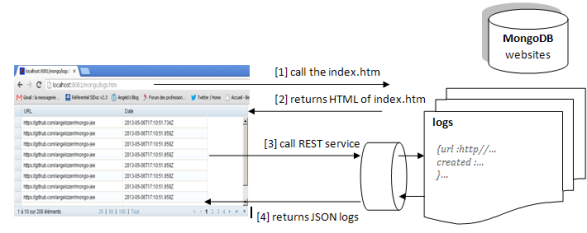
- step [1] : the user call the index.htm page.
- step [2] : the server returns the content of the index.htm page which contains the code of the Dojo grid (without the data).
- step [3] : once the dojo grid is built, it calls the REST service to populate the grid by sending on the HTTP Header the « Range » parameter (ex : items=0-9). This Range parameter tells to the server the from and to item index that grid needs to populate data.
- step [4] : the REST service request the MongoDB and returns the JSON coming from the MongoDB to the Web client. The dojo grid receives the JSON and populate the grid. When page link is clicked, the step [3] and [4] are re-played.
In this article, we will install and initialize MongoDB by creating a websites database which contains logs collection. A logs is just composed with date created and url.
MongoDB Install
Choose the mongo distribution
MongoDB Install is very easy, you must just download the well distribution according your OS. In my case, I have Windows XP, and since 2.2, MongoDB doesn’t support Windows XP.
So if you use Windows XP, the last version of MongoDB that you can use is the 2.0.8 that you can download mongodb-win32-i386-2.0.8.zip.
Unzip mongo distribution
Unzip mongodb-win32-i386-2.0.8.zip in any folder of your hard disk. In my case I have unzipped it in the D:/MongoDB :

Create data folder
MongoDB needs a folder to store data of the database. By default it search the data in the /data/db folder. In my case as I have installed my Mongo in D: folder, so I must create the data folder D:\data\db :

Start mongo
At this step, MongoDB is installed and now we can start it. To do that open a DOS command prompt and go at bin folder of the Mongo
In my case :
D:
cd D:\MongoDB\mongodb-win32-i386-2.0.8\bin
And after start the Mongo process by typing :
mongod

This process starts the MongoDB and listen by default to the 27017 port :

If you see the data folder, you will notice that a mongod.lock file is created with 1Ko:

It means that Mongo DB lock the files of the data folder.
When you stop the Mongo DB (with Ctrl+C) :

The mongod.lock file is updated with 0Ko:

I have noticed that if MongoDB is not stopped with clean mean (eg : Mongo DB crashes), the mongod.lock file can have 1Ko and it’s impossible to restart the Mongo.
To fix this problem, you must remove at hand this file before trying to restart it.
Initialize DB
Just for information, Mongo DB is composed with :
- several databases
- each database contains several collections (it’s like Table for SQL).
- each collection contains several document (or object) which are structured with JSON format (BSON) (it’s like record for SQL).
At this step we can initialize the DB by creating a websites database which contains BSON document log in the logs collection. To do that we can do it with several means (in a Java world) :
- Mongo Shell scripts
- Java code which uses Mongo Java Driver
- Pojo Mapper. You can compare Pojo Mapper to JPA. Pojo Mapper uses the Mongo Java Driver to connect to the Mongo and create a Pojo. Each Pojo Mapper provides their own annotations to manage the mapping between getter/setter of the Pojo and the BSON document property.
In this article we will use Mongo Shell scripts and in the next article [step1] Mongo Java Driver, and a Pojo Mapper.
Mongo Shell scripts
The mongo shell is an interactive JavaScript shell for MongoDB, and is part of all MongoDB distributions.
To use it, open a DOS command prompt and go at bin folder of the Mongo
In my case :
D:
cd D:\MongoDB\mongodb-win32-i386-2.0.8\bin
And after start the Mongo shell by typing :
mongo

This command open the Mongo Shell and connect it to « test » database. It doesn’t exists some commands to create a database. The database is created as soon as a first document is created.
In our case we wish to have websites database which contains logs collection. To do that, type this command :
use websites

If you see the data folder, you will notice that websites files is not created.
InsertLogsWithMongoShell.js
To insert logs with Mongo shell copy/paste this javascript in the shell :
for ( var i = 0; i < 100; i++) {
	db.logs.insert({
		"url" : "http://www.mongodb.org/",
		"created" : new Date()
	})
}
Key « Enter » to execute this script.

You can notice that there are no commit, because Mongo DB is not transactional.
If you see the data folder you will notice that websites* files which contains data are created :

FindLogsWithMongoShell.js
To check that our logs was inserted correctly, copy/paste this script :
db.logs.find()
Key « Enter » to execute this script and you will see the data logs as JSON format :

You can notice that there are « _id » property (that we have not filled). Each JSON document have an unique « _id » (that you can fill it if you wish).
RemoveLogsWithMongoShell.js
Here a script which removes logs:
db.logs.remove()
FindPaginatedLogsWithMongoShell.js
In your case we will need pagination logs. Here the script which manage pagination for logs collection :
var pageIndex = 0;
var pageSize = 5;
db.logs.find().skip(pageIndex).limit(pageSize);
Conclusion
In this step we have introduce Mongo JEE articles, install and initialize Mongo DB websites database with Mongo Shell scripts. In the next article [step1], we will use Java Mongo Driver and a Pojo Mapper to do the same thing.

This is one of the most wonderfully detailed, carefully thought-out blog series I have ever read. Thank you so much for taking the time to write it (and Open Sourcing Mongo JEE). You are a credit to the Java community.